Rousseau Band Director Section Kit Resources
Lessons
Discussions on Playing the Saxophone
The following video discussions by Dr. Rousseau were recorded in 1986 video Steps to Excellence: The Saxophone, by Yamaha International Corporation Musical Instrument Division © in cooperation with Indiana University Television. Produced by James Herendeen, Educational Director; Filmed by West Coast Media; presented with permission.
- Saxophone Fundamentals
- The Octave Keys
- Basic Saxophone Hand Position
- Sitting & Standing Position for Saxophone
- Reed, Mouthpiece & Ligature
- Vibrato – Articulation & Tonguing
- Tone Quality – Left Hand Technical Considerations
- Right Hand Technical Considerations
- Other Technical Considerations
See below for these video excerpts:
Saxophone Fundamentals
Dr. Eugene Rousseau discusses saxophone fundamentals, including pitch, intonation, mouthpiece position, air and embouchure, and comparing saxophone fundamentals with those of the clarinet.
The Saxophone Octave Keys
Dr. Eugene Rousseau provides fundamental information about the saxophone octave key.
Basic Saxophone Hand Position
Dr. Eugene Rousseau provides fundamental information about basic saxophone hand position.
Sitting & Standing
Position for Saxophones
Dr. Eugene Rousseau provides fundamental information about basic saxophone position for sitting and standing.
Saxophone Reed, Mouthpiece & Ligature
Dr. Eugene Rousseau provides fundamental information on saxophone reeds, mouthpieces and ligatures.
Saxophone Vibrato
Dr. Eugene Rousseau provides fundamental information on saxophone vibrato.
Saxophone Articulation and Tonguing
Dr. Eugene Rousseau provides fundamental information on saxophone articulation and tonguing.
Saxophone Tone Quality
Dr. Eugene Rousseau provides fundamental information on saxophone tone quality.
Left Hand Technical Considerations for Saxophone
Dr. Eugene Rousseau provides fundamental information left hand technical considerations for saxophone.
Right Hand Technical Considerations for Saxophone
Dr. Eugene Rousseau provides fundamental information on right hand technical considerations for saxophone.
Other Technical Considerations for Saxophone
Dr. Eugene Rousseau provides fundamental information on special technical considerations for saxophone.
Teaching the Saxophone Section - By Eugene Rousseau
For a more comprehensive discussion and annotations, read Eugene Rousseau: With Casual Brilliance and consult the other publications mentioned in this website.
Most saxophonists are initially attracted to the instrument by its sound and that topic is often what Eugene Rousseau addresses first in saxophone workshops, master classes, and his studio. Like Marcel Mule, he speaks of the saxophone in vocal rather than string terms, asking us to make the saxophone sing. His approach to the instrument appeals to listeners who are new to the saxophone as well as those such as the gifted jazz saxophonist Michael Brecker, who said, “I enjoy listening to classical saxophone players. I particularly admire Eugene Rousseau.”
Tone Production
Rousseau believes strongly that because the saxophone is a wind instrument it is crucial that a warm stream of air be used – “The air is the soul of the sound.” “The air stream is very similar to exhaling. Think of ‘warm air’, similar to fogging a mirror. The mouthpiece creates resistance and prevents the dissipation of the air.”
The concept of warm air is related to the amount of air employed and to its speed; it should not be confused with support of the air stream. He provides a concrete example to help the student learn to achieve a large, warm stream of air – “A small air stream, which is correct for the clarinet, produces a ‘sizzle’ sound. To produce a large air stream, fill a circle made with the thumb and finger held a couple of inches from the mouth.” Warmer air can also be created by changing the direction of the air stream. Blowing down without changing the position of the head is another of Rousseau’s techniques to help the student understand the concept.
The embouchure is the connection between player and instrument. Rousseau has described the embouchure as solid and round, like forming the syllable “0” or “00.” The lower lip is often too smooth or stretched, whereas it should look to be a little bunched in order to form a cushion for the reed and dampen its vibrations. The corners of the mouth must be well-supported and the feeling of roundness should extend back into the mouth; he recommends the player “think of the inside of the mouth as part of the air column” because “the generation of the tone does not start at the tip of the mouthpiece, but back within the player.”
Air Column and Embouchure
Developing a good saxophone section -whether in concert band or big band, requires a good tone, which is the most vital part of playing the saxophone. The tone is created by the air column, which is controlled and refined by (1) the air used and (2) the embouchure.
Air Column
Players can improve their tone by inhaling quickly and deeply through the corners of their mouths. This will keep the basic embouchure position intact so that the player can resume a good tone immediately after inhaling.
Embouchure
- Lower lip curved over teeth, drawn toward center for cushion
- Teeth must rest on top of the mouthpiece.
- Chin should be normal, not pointed.
- Bring corners of the mouth in, toward the center -round feeling.
- Shaped should feel very solid, but not tense.
The Correct Balance between Air and Embouchure
To determine the correct balance between air and embouchure, a simple test is to play a note using only the mouthpiece. The goal is to achieve the following pitches:
- Take a quick, deep breath
- Sustain the following concert pitch at ff:

Keep the embouchure round. If the pitch is too high, think of a larger circle. If it is too low, think of a smaller circle. The air flow is controlled by the position of the tongue, so you may have to experiment by thinking of a different syllable -from “ee” to “ah.”
Saxophone Equipment and the Saxophone Section
It is important understand that not all saxophones makes and models respond in exactly the same way. At times, we might blame the player when, in reality, this complex instrument can fail mechanically in many small ways that affect performance. In fact, some instruments may have flawed or obsolete designs which make blending more difficult.
Upgrading the Mouthpiece
Whether one can or cannot upgrade an instrument, upgrading the mouthpiece will enhance performance. Upgrading an entire section’s mouthpieces can also provide excellent results, especially if the mouthpieces are of similar make and design. The mouthpiece design transforms the player’s air into sonic speed and, together with the reed vibration generates the key elements of good tone.
Directors should be aware of the mouthpieces and other equipment being used by each player. Most concert band directors, for example, would not allow a metal mouthpiece to be used for concert band performance. Also, there are hard rubber jazz mouthpieces that are not appropriate for concert band application. Playing on student “beginning” models cannot provide the depth of tone needed for a good saxophone section sound. Having all players in the section use the same style/brand of an advanced mouthpiece will help to congeal a section sound more quickly. For most student players, look for mouthpieces such as the E. Rousseau® New Classic models that provide great response, but also a well-controlled tone.

For more information on how band directors have found greater saxophone success with E. Rousseau mouthpieces, see this study.
The areas of the mouthpiece critical to influencing tone quality are the opening and length of the facing, balanced side rails, a chamber of appropriate size, and a well-designed baffle. There needs to be a good balance in these design features so that the tone quality is desirable, yet allows the player to have flexibility and control in all registers, and at all dynamic levels. “My main concern has always been to find what I believe to be the best balance among: tone quality, response, projection, dynamic control.”
Reeds and mouthpieces are additional areas of concern. Rousseau observes that almost every classical saxophonist uses medium equipment that is very similar; this is not true of jazz players, who exhibit very personalized forms of expression. Because of the wide tip openings of their mouthpieces most jazz players use 2 or 2-1/2 strength reeds. He observes that it is much easier to get a jazz sound on a classical setup than the reverse. The optimum position of the reed is even with the tip of the mouthpiece at eye level.
Rousseau describes dealing with reeds as “a constant process; the ‘number one’ reed is always changing.” He is not committed to one brand of reed but pragmatically uses whatever reed produces what he wants.
Mouthpiece Position
The amount of mouthpiece in the mouth may only appear to be different for each player but a student with a large lower lip in fact may need to take a little more mouthpiece in. Too little mouthpiece and reed in the mouth will cause the sound to be muffled; too much mouthpiece and reed causes a lack of control. He has no objection to the use of tape or a dental appliance by those players who have sharp lower teeth as he does. The embouchure is the same for all saxophones, changing only the size and not the shape of the circle. Rousseau warns players not to be afraid to make a slight embouchure change to get the sound they want. This is in keeping with his recent suggestion that a more elliptical pear shape may be a better description than simply round; he cites renowned singer Thomas Hampson as describing tone production in exactly the same way.
Bumping the Octave Key
One tool for determining the correct amount of pressure around the reed and mouthpiece is the technique of “bumping the octave key.” The student plays a left-hand note such as B, A, or G and uses the right hand to flick the octave key. The saxophone should respond immediately, first to the upper octave and then return to the lower. If this does not occur, the air/embouchure balance is not correct and the size of the embouchure needs to be adjusted. The right hand is used to operate the octave key in order to minimize any reaction from the embouchure or air caused by the normal use of the left thumb.
Play the Mouthpiece Alone
An important method to learn the balance between air and embouchure is the technique of playing the mouthpiece alone. Produce concert A (for some players, B-flat) above the staff on the alto mouthpiece alone at fortissimo. If the pitch produced is C or C-sharp, the air pressure is the greatest and the air quantity the least. For tenor, the concert pitch is G. On baritone, the pitch is concert D and, for soprano, C above the staff. Note that the same pitch can be produced on the soprano and the clarinet mouthpieces. The size of the two mouthpieces illustrates the need for more air on soprano. One can play the range of a whole octave on the alto mouthpiece, less on the other mouthpieces. With such a wide range from which to choose, we must select the correct pitch. Or, stated another way, the embouchure is solid; it’s the air stream that is ‘loose’.
Rousseau is adamant that the jaw not change position when playing low B-flat or high F-sharp and recommends the practice of slurred descending octaves. Practicing a note decrescendo, especially with a tuner, is also an excellent tool for developing the tone. Yet another suggestion is to “verify the tone from time to time with a fermata.” 116
Sometimes a student will have difficulty with the low register. Rousseau suggests:
- Check the air/embouchure balance (Is the embouchure loose? Is the air stream thin?).
- Perhaps the bow is too large
- Check the low C-sharp adjustment.
- The reed is not sealing.
- The bow seam is leaking.
- The articulated G-sharp key is open and needs to be adjusted.
Palm Key and High Register Notes
Problems with palm key notes, such as D through F-sharp above the staff, are addressed through a specific technique. Using the rhythmic pattern of four eighth-notes and a half-note and beginning with high C-sharp, start each note with the air only. Repeat the pattern for high D and continue the pattern chromatically to F-sharp. By eliminating the tongue, the player is forced to use the air correctly. After a short period of reinforcement of learning how to use the air, the tongue can be reintroduced. Rousseau suggests, however, that it is often best to “air articulate” in the high register in any event, especially on soprano saxophone.
Rousseau believes that the playing of octave slurs is one of the best exercises to improve the high register. “A student will automatically find the right [tongue] position with the F octaves. The tongue position controls the speed of the air.” An additional exercise is to practice slurs from high B to high C-sharp, to D, and so on. “B is an easy note – bright, clear, and free. Continue that good sound to the higher pitches.” In all registers, a decrescendo on the mouthpiece alone is the best long tone exercise – “That is the test. One should keep the air going with the same focus as at forte. Don’t let the air stream thin out by keeping the same basic pitch on the mouthpiece softly as loudly.”
Choice of Instrument
The construction of the instrument also affects tone quality. There are seven areas to be considered:
- The length and taper of the tube, including the bocal, mouthpiece, and reed.
- The thickness of the metal – generally speaking, thinner is better but the optimum thickness is about .085 inch. Incidentally, Rousseau says that Selmer and Yamaha use the same brass alloy (65 copper and 35 zinc) in their saxophones.
- The location and size of the tone holes, including the pad height and pad material.
- The number of tone holes, known as “chimneys”, which are interruptions to the air column.
- Dampening factors such as those posts and keys which are hard soldered onto the tube, ribbing which is soft soldered, and leaks.
- The presence or absence of a rod at the opening of the bell.
- The use or non-use of annealing during the manufacturing process, in which the metal is heated and then slowly cooled to prevent brittleness.
Another matter of difficulty, especially on tenor saxophone, is “cracking” on the written G and G-sharp above the staff. Again, Rousseau offers a checklist:
- This is a result of the lower octave key being too low on the instrument body.
- It can be corrected by using the “bumping the octave key” technique.
- Sometimes the player is “too open, too loose … going too much for the lower octave.”
- “The air speed does change. The point is that it is much less than people think. It’s not 100% the same, but it’s darned close.”
Notes on “The Other Saxophones”
If you play only one saxophone, you don’t play them all.” Rousseau believes in the value of versatility, whether it is the ability to speak the language of classical music in addition to the language of jazz, to teach music history and music theory, or to have a working familiarity with soprano, alto, tenor, and baritone saxophones. He encourages his students to perform on more than one member of the saxophone family because “if you play more than one saxophone, you’re doubling.”
Most important among the differences between the various saxophones is the mouthpiece pitch for each instrument – concert C for soprano, A for alto, G for tenor, and D for baritone. Although soprano and tenor, like alto and baritone, are pitched an octave apart as instruments, the mouthpiece pitch is not. The shape of the embouchure is the same for each saxophone but the size of the shape changes with the size of the instrument – “When changing saxophones, change the size of the circle.” The larger saxophones require a larger quantity of air as well- the displacement (i.e., the amount of air inside the instrument) of the tenor is eight times that of the soprano and the displacement of the baritone is eight times that of the alto. “Each instrument has an optimum amount of air.” The soprano, for example, should not use an air stream like the alto or the clarinet – it’s in between. An air stream that is too thin on tenor will be, when compared to alto, even more detrimental.
Intonation tendencies also vary. For example, high E and F can be sharp on alto saxophone but are often flat on tenor; low B may be sharp on soprano but flat on baritone. Middle D tends to be sharp on each family member but is markedly so on tenor; sometimes LSKI can be used instead of the octave key to help with this problem. G above the staff is often quite sharp on baritone and therefore the lower octave should be used to tune concert B-flat. E on alto is high, while on soprano it is low; B on alto will be slightly low, while on soprano it has a tendency to be high. Other tuning situations specific to each of the different saxophones are found in the chapter on tuning.
There are differences between certain registers as well. The soprano, for example, is more resistant than the alto in the lower register. Difficulties with pitches in the soprano’s upper register can be similar to the problems encountered in the altissimo register of the alto – in each case, using the air rather than the tongue to articulate is advisable. The baritone’s “cracking” between middle D and G-sharp (where the lower octave vent is employed) is characteristic of the instrument. The tenor’s high G and G-sharp (the highest notes of the first octave key) are also unstable and as a result have a tendency to crack because the upper vent tube is too low; Rousseau recommends playing the pitches without tonguing in order to “find the target.”
There are crucial differences in the altissimo register, which is most difficult on soprano and less so on the larger instruments. The tenor is frequently flat in that register and often should use fingerings that are a half-step higher than the alto; in other words, use the alto’s G fingering for the tenor’s F-sharp. Unlike the smaller saxophones, the baritone overblows the palm keys a minor sixth; as the palm key pitches become higher it gets closer to a major sixth.
Soprano
“The soprano is not a gold-colored clarinet” and therefore requires a different embouchure and air stream than the clarinet. The soprano will feel different because the hands are extremely close to the body but there is no substantial difference in the angle between soprano and alto because the angle of the head is different – the critical factor is that the instrument must come to the player comfortably.
Be certain that the weight of the instrument is on the neck strap rather than the hands, especially the right thumb. The shorter levers of the soprano compared to the alto will result in much less distance traveled by the keys and will be very obvious to the player. “Don’t put too much air through the soprano – there’s a maximum point.” For an instrument with a curved neck, the bell is almost straight down with the right hand very near the body. The straight soprano is at such a different angle (it must either be held out or the player must duck his head) that it may sound very differently to the performer but not to the audience. Rousseau notes that simply supporting the straight soprano saxophone with the right thumb can create a problem of endurance.
The soprano saxophone seems to present more possibilities for unique trill fingerings.
- High D to E: Trill the LSK3. Trilling the RSK4 may also work.
- C to D-flat: Trill the RSK2 or, possibly, the RSKI and 2 together.
- A to B: Trill the RSK2.
- A-flat to B-flat: Trill the RSK.
- Middle D pianissimo: Use the RSK3 only.
- Middle C-sharp: It is possible to finger low C-sharp without the first finger of the left hand and with no octave key.
- Middle F-sharp: It is possible to use the ring finger (instead of the middle finger) of the right hand.
Tenor
The tenor saxophone shares many intonation tendencies with the alto. However, both fingerings for high F are flat on tenor; adding the G-sharp key to the front F fingering can help. When playing the tenor from a seated position, don’t let the right arm go back. Whether playing seated or standing, the instrument should be kept forward. Unlike the other saxophones, tenors with the RSK4 can play the side keys up to middle F. Rousseau finds that it is easier to get good reeds for tenor and baritone than it is for soprano and alto.
Baritone
“You’ll never regret getting a baritone with a low A. The high F-sharp is not as important.” One should be aware that the low A key will cause the left hand to assume a slightly different position.
Because of the tremendous weight of the baritone saxophone, several approaches have been taken. Rousseau thinks that a floor peg similar to that found on bass clarinet is the best answer. A socket is soldered to the bottom of the instrument and an adjustable rod is screwed into the socket. A harness is also possible as is a tripod, but that seems to be the least satisfactory solution because of the lack of flexibility.
One must remember to play out on the baritone because its sound will not carry as much as the alto. “You will never have too much air with either baritone or flute.”
Tuning the Concert Band Saxophone Section
Many student players take the time to tune to one note — which is fine for a start. However, it is necessary to relate to different notes when working with a saxophone section.
In tuning the saxophone AND a saxophone section it is best to start with two notes:

When tuning the saxophone section I recommend that all play B because this allows us to hear each instrument on a note that is in the same position acoustically.
B may seem a trifle flat, which is OK. If B is sharp the mouthpiece needs to be pulled out slightly. Then, play F# to confirm the mouthpiece position. In tuning the saxophone section, after the alto has tuned, the tenor should also play B. This will produce an interval of a perfect fourth which, if not in tune, is very easy to hear. After the tenor has tuned with the alto using this perfect fourth, the baritone should now play B with the tenor. This will produce a perfect fifth which, if not in tune, is also very easy to hear.
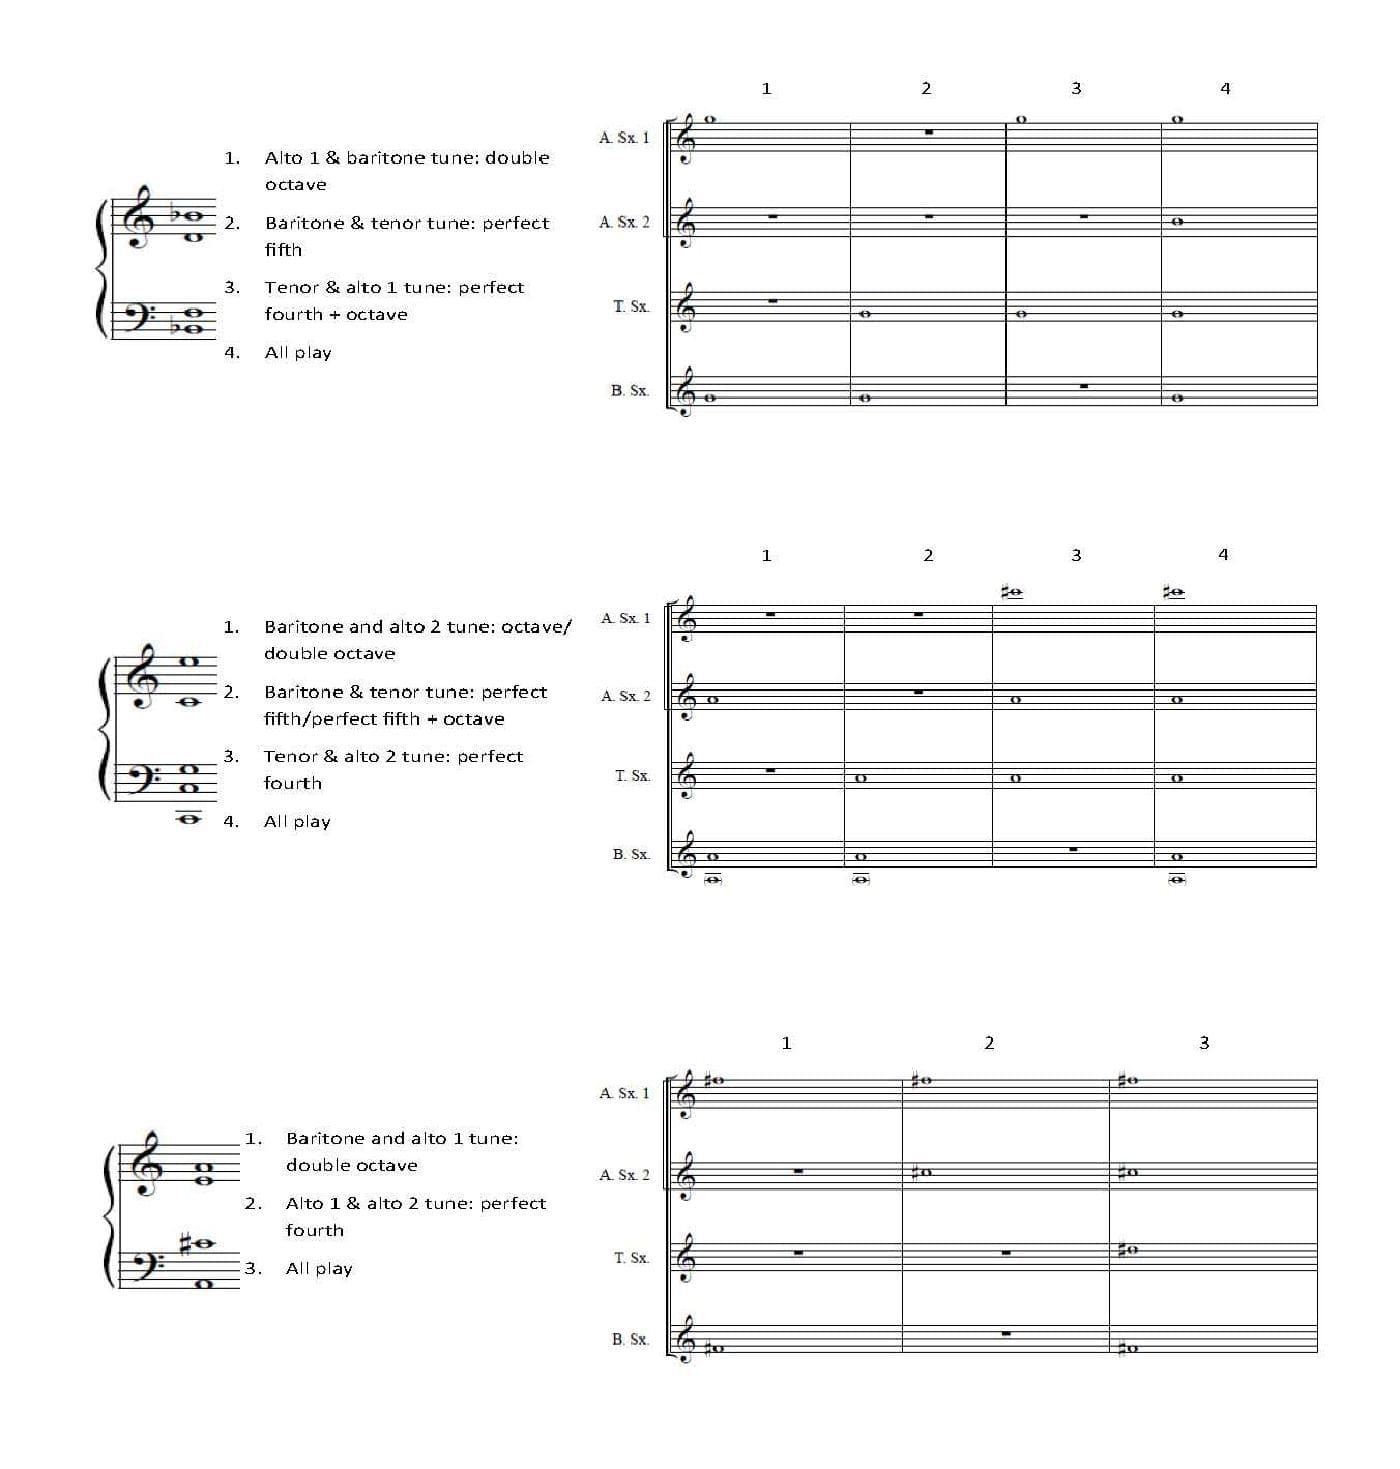
Then, when tuning the section further, note the five examples below. These chords are in concert keys, followed by the steps for tuning. In tuning chords it is important to begin with unisons and octaves, then fourths and fifths, as these comprise the foundation for good intonation, and they are the easiest to hear. Given here are only five examples, but the creative teacher could create many more.
For a list of publications, books, DVDs, solo and ensemble music and more for saxophonists at all levels, please visit the Music and Publications page.